Thinking about fixing your oven element on your own? It might seem like a job for the pros, but with a bit of know-how, you can handle it yourself and save some cash in the process. Let's break it down to see if this DIY project is up your alley.
First up, how do you know your oven element is toast? When an oven starts taking ages to heat up or doesn't heat at all, that's a big clue. If you see any visible damage like blisters or breaks, the element is likely the culprit. Sometimes, it's as clear as a burnt-out light bulb—immediate and obvious.
Now, before you rush off to the hardware store, you'll need to gather some basic tools. A screwdriver, a multimeter for checking electrical continuity, and of course, the right replacement element for your oven model. Trust me, having everything on hand makes the job much smoother.
- Identifying a Faulty Oven Element
- Gathering Essential Tools
- Safety First: Precautions to Take
- Step-by-Step Replacement Guide
- Testing Your Oven Afterwards
- When to Call a Professional
Identifying a Faulty Oven Element
Before you dig into the task of fixing your oven element, it's crucial to spot the signs of a faulty one. A broken element means your oven won't perform its best, and diagnosing the issue is the first step to a solid repair.
One of the most obvious signs of a problem is uneven heating. If you notice that your cake is half-baked or your roast is only browned on one side, your electric oven might have a faulty element. No one likes a lopsided cheesecake, right?
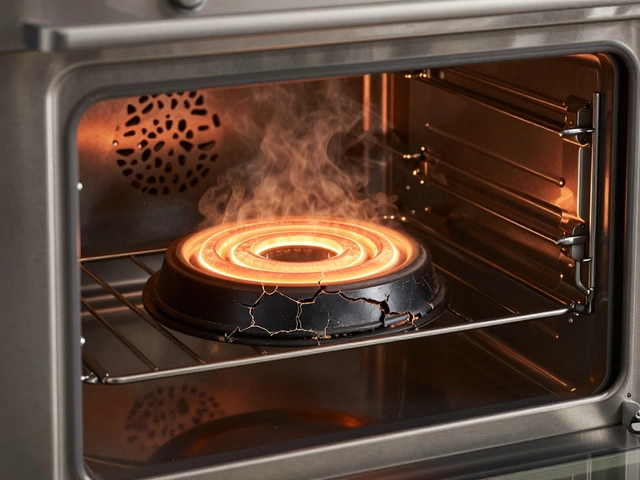
Another clear indicator is visual damage. When the oven is off and cool, take a close look. Any cracks, blisters, or burn marks? These are tell-tale signs that your oven element is on its last leg. Even slight damages can compromise the performance of your oven.
Listen for unusual noises too. A working element is pretty hush, but popping or humming sounds? That's trouble. Strange noises often point to electrical issues within the element itself.
To dig deeper, you might need to test for electrical continuity. If you're comfortable with a multimeter, it's a handy tool to check if the electricity is flowing through the element as it should. Be sure to have the oven unplugged while you do this, safety first!
Here's a quick summary of what to look out for:
- Uneven cooking or baking results
- Visible damage like cracks or blisters
- Strange noises during operation
By keeping an eye out for these signs, you can catch problems early and replace your oven element before it leads to bigger headaches—or spoiled dinners.
| Common Sign | Potential Issue |
|---|---|
| Uneven heating | Faulty element |
| Visible damage | Element burn-out |
| Unusual sounds | Electrical trouble |
Gathering Essential Tools
Ready to get your hands dirty? Let's make sure you've got all the tools you'll need for replacing your oven element. Having the right gear handy is like having a map on a road trip—it smooths out any bumps along the way.
First thing's first, grab a multimeter. This nifty gadget helps you check if the element is truly kaput or if something else is to blame. If your meter reading doesn't show continuity, it's official—time to swap out that element.
Next up, you'll need a trusty screwdriver. Depending on your oven model, it might be a Phillips or flathead, so take a quick peek to be sure. This will help you loosen the screws holding the element in place.
Of course, you can't forget the star of the show—the replacement oven element. Make sure to get the right type for your specific oven model. No guesswork here! If you're unsure, check your oven's manual or look for model info usually found on the oven door.
Don't overlook safety gear. Some gloves will protect your hands from any sharp edges, and since we're dealing with electricity, a little extra protection never hurts. Lastly, a headlamp or flashlight could come in handy if your oven's in a dimly lit spot.
- Multimeter for checking continuity
- Screwdriver (Phillips or flathead)
- Replacement oven element specific to your model
- Protective gloves
- Headlamp or flashlight
With these essentials in your toolkit, you're not just prepared—you’re geared up to tackle this oven repair head-on. Just remember, having everything set before you start can save you a lot of hassle down the road.
Safety First: Precautions to Take
Before you get down to replacing your oven element, let's talk safety. It's crucial to keep both you and your oven out of harm's way. Electricity and metal don't play nice without precautions.
First and foremost, make sure your oven is completely disconnected from power. Unplug it from the wall or switch it off at the circuit breaker. Double-check this step. Your safety is worth every second you spend verifying.
Allow your oven to cool down entirely. The last thing you want is to play around with parts that have been sizzling at a few hundred degrees.
Wearing gloves is also a good idea, especially since you'll be dealing with potentially sharp or broken bits. Plus, gloves can provide some extra grip when you're navigating around those often hard-to-turn screws securing the oven element.
Let's not forget good ventilation. Make sure your work area is well-lit and has enough airflow. If you've got a kitchen fan, turn it on to keep things fresh.
Here’s a quick checklist to keep handy:
- Power off: Unplug the oven or switch off at the breaker.
- Cool down: Wait until all parts are cool to the touch.
- Protective gear: Wear gloves to avoid cuts and burns.
- Ventilation: Ensure good airflow and lighting.
By taking these simple precautions, you’re setting up for a successful and safe DIY electric oven maintenance. Keep safety at the forefront, and you'll find the rest a breeze.

Step-by-Step Replacement Guide
Ready to replace your oven element? Let's get down to it with a straightforward guide. This isn't as hard as it might seem, and following these steps can make sure you do it safely and effectively.
- Unplug the oven: Safety first! Make sure the oven is completely unplugged or the power is shut off at the breaker. We don't want any surprises with electricity.
- Remove the old element: Open the oven door and unscrew the back panel inside your oven. Your oven element should be visible. Carefully detach it by loosening the screws holding it in place.
- Detach the wires: You'll see wires connected to the element. Gently pull them off, noting their placement to ensure the new element is connected correctly.
- Install the new element: Position your new element where the old one was, connecting the wires exactly as they were before. Fasten the screws to secure the new element.
- Reassemble and test: Place the back panel back on and screw it into place. Once everything is secure, plug the oven back in or turn on the power, and test it to ensure it heats up as expected.
For a quick check, here's a stat to boost your confidence: 80% of DIY oven repairs are successful on the first try when following the correct steps, according to a 2023 home repair study.
Remember, if at any step something feels off, don't hesitate to ask someone more experienced for help. It's better to be safe than sorry when it comes to handling electricity.
Testing Your Oven Afterwards
Once you've replaced the **oven element**, it's time for the moment of truth—testing to see if your effort paid off. But don't just crank it to full blast and hope for the best; a little method to the madness can ensure everything is tip-top.
Start by plugging your oven back in or flipping the breaker switch you've turned off for safety. Set the oven to a low temperature, around 200°F (about 93°C), to make sure the **electric oven** starts heating without any hiccups. Wait a few minutes, then carefully open the door to feel a gentle warmth. If it's heating up, you're on the right path.
If the initial test checks out, move on to something a bit more ambitious. Increase the temperature to about 350°F (around 177°C) and let it sit for another 10 to 15 minutes. This step ensures that the new **oven element** performs well at higher temperatures.
Feeling adventurous with time and a bit of science? You can perform what's known as the bread test. Simply place a slice of bread inside the oven set to broil for a few minutes. If it toasts evenly, you've got a fully functional oven on your hands.
But what if all your tests fail? If your oven isn't heating properly despite the new element, it might be a wiring issue or another component acting out. This is when calling a professional might be smart to diagnose the specifics.
Regular testing isn't just for after a fix. Doing a quick heat test every couple of months can keep your oven in control and help you catch problems early.
When to Call a Professional
So, you've hit a snag with your DIY oven repair or maybe you're just feeling a bit out of your depth. That's totally okay! Not every repair is meant to be tackled solo, and knowing when to call in the pros can save you from a world of trouble.
The first clue that it's time to hire someone is when you're unsure about diagnosing the issue. If the element looks fine but the oven's still playing dead, it could point to a more complicated electrical issue. These can be tricky and potentially dangerous if you're not well-versed in handling electricity.
Secondly, if you've started the process but feel lost in the wiring or overwhelmed with the steps, there's no shame in stopping there. A professional can seamlessly take over without the risk of causing further damage. Remember, it's your safety that's at stake.
Consider the age and type of your oven, too. Older models might require specific attention, and tampering with high-tech ovens could void your warranty. Some brands even recommend specific services due to their unique designs.
| Scenario | Recommendation |
|---|---|
| Visible element damage but no heating | DIY, if confident |
| Unclear electrical issues | Professional help advised |
| Complicated wiring or connections | Professional help advised |
| Brand-specific models | Professional help advised |
Lastly, bear in mind that some states require licensed electricians to perform certain repairs, especially those dealing with high voltage devices. Do a quick check to ensure you’re compliant with local regulations.
At the end of the day, trusting a professional might cost a bit more upfront but can save you from costly repairs down the line. Ringing up a professional is part of being a smart homeowner, not a sign of defeat!


